HAVE YOU MADE A SOMETHING USING A PATTERN CREATED BY A VISION TO REMEMBER?
email it to boblyns at yahoo dot com

Be Featured on A Vision to Remember. Please email me at boblyns at yahoo dot com if you are interested


Saturday, April 30, 2011

Check ME Out Saturday Week 63 Crafty Link Party

Welcome Back!  Its another week of Check ME Out Saturday.  There were some really awesome links last week.  Here are a couple of them:

Nylon flowers from Craftionary

This awesome Blue Dresser from CreativePassage

You know what to do...link up what you have been working on!  Please no etsy shops or things you are selling!  I can't wait to see what you all have been up to!


Photobucket

Friday, April 29, 2011

Blog Swap with Sumo


Hello
everyone!


I'm so excited to be blog swapping with
Bobbie today. I always love blog swapping because I get to 'meet' new
people!

I'm Sumo, from Sumo's Sweet
Stuff
!


Sumo's Sweet Stuff

My real name is Summer, but my husband
nicknamed me Sumo when we were dating. (Should I be offended?) Now
he's got all of my family, as well as lots of our friends, calling me
Sumo. I think Aunt Sumo sounds pretty great, don't you? I live in Utah
with my husband, and our two beautiful daughters - Remi &
Reece!


I started Sumo's Sweet Stuff as
a place to keep some of my crafting projects so that my personal blog
wasn't overrun with them. Somehow, that developed into a place to host
giveaways, share tutorials, share recipes, and feature fellow
bloggers' ideas and blogs! I started sewing just over a year ago, and
I don't know what I did before Shirley was in my life.

Who's Shirley? She's my sewing machine. I've
also got Lucy, my Silhouette. I love spending time with these
gals.

Every Monday is Market Yourself Monday,
where you can link up your latest projects, and visit other blogs to
get some inspiration!
Sumo Sweet Stuff
Here's a little sampling of
some things you can find over at Sumo's Sweet
Stuff
:


Thanks for letting me drop in
here today, Bobbie!
Hope to see you all over at Sumo's Sweet Stuff
soon!

Wednesday, April 27, 2011

Scrap Fabric Ideas and MAY'S SCRAPPY BUSTER

I have so many scraps.  I think they might be growing out of my ears.  I think its high time that I started using them up.  So for the month of May I will be featuring different scrap buster projects.  I will also be doing a special Linky just for your scrappy projects!  So keep an eye out for that.  Here are a few to get us started:

Scrap Ribbon Flower HERE
Awesome Owl Embellishment HERE


Obsessively Stitching has this adorable ticker tape I spy quilt


So get thinking about what scraps you have and what you want to make using them.  I know my wheels are a turning. 

If you have any projects you would like featured/spotlighted let me know.  If you know of a great tutorial I should feature (on your blog or others) I would love to know!  boblyns at yahoo dot com

One last thing...if you would like to design me a nice little button I will give you 3 months of free advertising in exchange.  If you submit a button and it isn't chosen for the scrapbusters month I will still give you some free advertising or maybe even a bag of scraps for you to play with!


Photobucket

Tuesday, April 26, 2011

Adding Pockets to Rag Apron Pattern

Remember the bee apron yesterday?  I added pockets to it.  As promised I will show you how to add the pockets to the Rag Apron Pattern


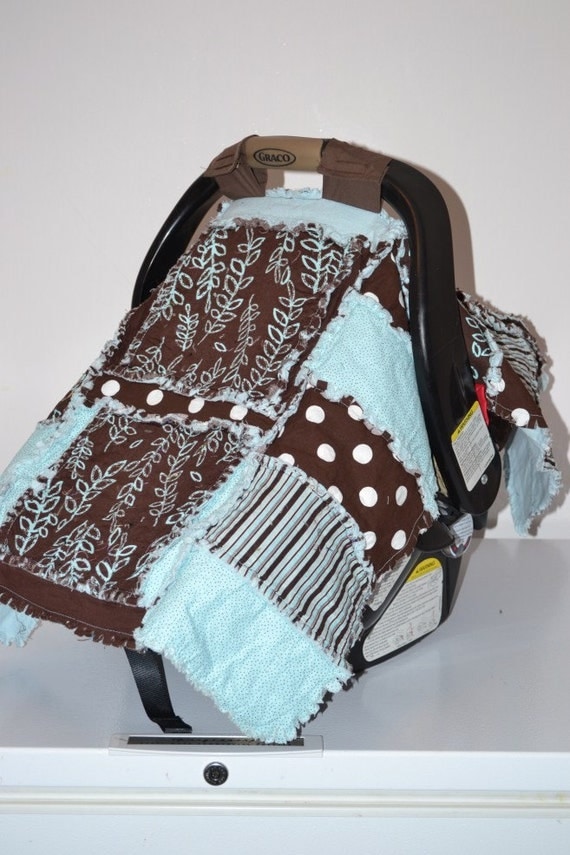
Follow the directions for the rag apron.  When cutting out the fabric cut out 2 pieces that are 5 x 12


Then cut the pieces of fabric like the above diagram.  Cutting out the small triangle piece.  You could add a nice little curve to the pocket as well if you would like.  Make sure that you do the mirror image on the 2nd piece so that the decorative side of the fabric has a triangle on the right and the 2nd decorative side of the other piece of fabric has a triangle on the left side.  Make sense?


Then sew along the diagonal  with a straight stitch about 1/4 of inch from the edge. 
Then when you are assembling the rag apron.  Make sure to add the pockets onto the 5 x 12 inch rectangles while sewing them onto the other squares.  


Photobucket

Monday, April 25, 2011

Flirty Apron Swap with Bee's

I came across this really fun apron swap about a month ago  It is called the Flirty Apron Swap.  I decided to take the plunge and try it. 

I think I got the perfect person to send one to.  I have been wanting to applique bees for awhile now.  I have had the pattern made up for awhile now but just hadn't had the time or reason to sew something with bee's on it. 

Find the free downloadable beehive applique HERE  
The Bee applique is HERE

The lady that I sent my apron to loves bee's.  She loves everything about bee's.  Perfect!  So I made her an apron using THIS pattern.  I even added pockets for her.  I will show you have to adjust the pattern tomorrow to add the pockets. 

Now how did I applique the bee's and the beehive?
1.  download the applique patterns above
2. cut out the pattern pieces
3.  using your pattern pieces cut out the appropriate amount of pieces with you fabric
4.  pin the pieces in place onto the fabric that you want the appliques to be on
5.  sew with a straight stitch around each piece and where indicated. 
6.  I used a really tight zig zag stitch about a 1/4 inch wide for the eyes and the antennas.  The antennas are not on the pattern pieces.  I just kinda eye balled them in place. 
7.  Finish the product that you are making and then wash it to fray the edges a little of the applique. 


Photobucket

Friday, April 22, 2011

Blog Swap with Today's top 20

I am so excited to introduce to you Amanda.  I found her through twitter and we are becoming fast friends!


Hello Vision to Remember readers!  I'm so excited to be here with you guys! 
I'm Amanda - I write 2 craft blogs as well as contribute weekly to a third.  {Can you tell I like to blog AND craft?!} 
Today\
Today's Top 20 is a place where you can find awesome inspiration.  Each day there are 20 new ideas to get your creative juices flowing - 5 of each sewing projects, crafting, printables and recipes!  Something for everyone!  It's also home to Blogger of the Month.  It's a fun little 'contest' at the end of each month.  You can link up your best project that you've made and then the judges pick their top 10.  Then everyone votes.  And the winner gets an awesome prize! :)  So be sure to enter on the 30th!
We Are The Joneses
We Are The Joneses is my little space where I share my own tutorials, crafts, photos and such. 
And I contribute over at This and That Creative.  I work with such a great group of ladies over there who always have something neat to work on!
Gabe's Gifts
One thing you will notice on all 3 blogs are blankets.  Once a week is a blanket post.  Why?  In August of last year we lost our son Gabe due to a miscarriage.  It was so hard and we were devestated.  I really wanted to do something positive to remember him.  I wanted his name to be associated with something good instead of what could have beens.  So, I started a blanket drive called Gabe's Gifts.  All blankets that I recieve go to Project Linus (awesome organization by the way!).  So each week there is a blanket tutorial to help inspire you.  At the end of each month there is a blanket party too.  So come link up your blankets! :) You can read the full story here.
But enough about me...You all want the tutorial! 
I'm always finding cool pillowcases at the thrift shop and Goodwill.  And for 50 cents why not pick them up!? 
My son loves Mario.  So when I found this pillowcase it was a no brainer. 
If your son is like mine, then he's on the go -- a lot!  Grandma and Grandpas, friends house, other Grandma and Grandpas, in the car ... go go go! 
Time for a tote bag! 
And pillowcases make it SO quick (about 15 minutes) and EASY!!!
First make your straps.  I cut mine about 24 inches long and 4 inches wide.  You will need 2!
To make the straps fold over one edge to the half way mark and pin. 
Repeat on the other side.  Then fold in half and sew together. 
Figure out which side you want facing and which to be lining.  I chose to have Mario on the inside due to where the fold is.  Plus, we like green so Luigi wins. :)
I cut about 3 1/2 inches off the bottom since this was going to be a child size bag.  Then you cut a small square in each corner. 
{Can you believe it?  That's ALL the cutting!}
Pin the side and bottom.  Leave the top and the square cut outs unpinned.
To place straps, fold the bottom and the sides in.
Pin your straps on giving about an inch to sew securely.  Then flip and pin on the other strap so they are nice and even.
Sew around your pinned edges.  You will want to use a zig zag stitch to make it super secure.
Now you just have the corners.  Pull the inside corners to make a flat base - match up your zig zag stitch that you have done.  Stitch with a zig zag.
Flip right side out.  And your done! {We take Yohi everywhere!}
Nothing like getting your picture taken first thing in the morning!! {P.S.  You like his Pj's?  Daddy let him pick out jammies last night -- out of my Goodwill pile!! Did he not notice how small that shirt was?! }
Just focus on the bag! :)  Someone is getting a haircut! TODAY!
He really does love the bag.  And I'm happy that it is the perfect size for him to carry his own stuff!  {And I just can't get over this pj/hair situation...lol}
Thanks so much for having me!  I hope you will come visit me soon!! 

Don't you just love that bag?  i know that I do!  

On a side note...for some reason I thought I had to have my post up for Check me Out Saturday last night.  Who knows what I was thinking...Seriously!  So instead of coming back tomorrow you can have a days head start and link up HERE Today!


Photobucket

Thursday, April 21, 2011

Check ME Out Saturday Week 62

Welcome Back!  Check out the yummyness from last week:


Rainbow Cupcakes from Running with Glitter


Adorable Giraffe that kids can do from Serving Pink Lemonade


Painting with Ice from Everything Else I love

This adorable coffee table from I Should be Mopping the Floor

Now you know what to do.  Link up what you have been working on this week.  Please don't link up shops and please link directly to the blog post and not just your blog.  Thanks!